Road Bike Fit
Overview
The intended audience for this guide are riders who want to achieve ideal fit but aren’t quite sure how to get there. This guide will be of greatest value to riders who are shopping for a new bike/frameset and want to make sure that they can achieve ideal fit on their target frameset without having to make any compromises such as:
- Use of short stems.
- Excessive stem spacers
- Zero setback seat posts and or saddle in an excessively forward position on the rails.
Me, I love all aspects of cycling and that includes how my bike looks.
To my eye the use of items 1-3 detracts from the look of road bikes. You may be able to achieve good body position on the bike but your bike isn’t going to look as good as it should.
If you don’t care about how your bike looks then picking a frame size/geometry that will allow you to achieve good body position will be a lot easier. If on the other hand you do care how your bike looks then you are going to have to do a lot more work and maybe even some math in order to ensure that you are choosing the ideal frame/size geometry.
It took me 20 years of experimenting, going through multiple fit sessions with “bike fitters” and educating myself before I figured out how to choose the ideal frame size/geometry for my preferred riding style.
The ideal frame size/geometry for you is a function of your preferred riding style which is a function your experience and flexibility. If you are new to road bikes then it might take time for you to identify your ideal position on the bike as your fitness and flexibility change over time. As a consequence, you might want to hold off on buying your dream bike until you are sure what your ideal position on the bike is.
You might like being long and stretched out or maybe you have flexibility issues that restrict how much saddle to bar drop you can tolerate. In my opinion how much saddle to bar drop you can tolerate is probably the most important aspect of your ideal position on the bike and the thing you really need to focus on when looking at frame specs. The last thing you want to do is to go out and buy a bike whose stack is too short and end up needing to add 4cm of stem spacers in order to get the saddle to bar height differential tolerable.
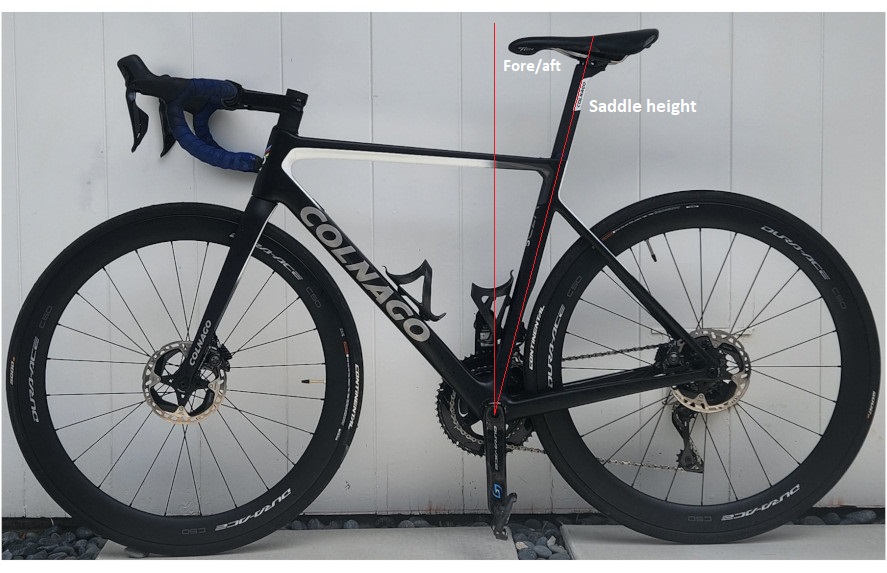
Ideally you have ridden enough to know where you like to be relative to the pedal spindles/bottom bracket (saddle fore/aft), how long you like to be (reach to the bars), how much saddle to bar drop you can tolerate and lastly your ideal saddle height. If you know these 4 fit parameter then there is no reason for you to be on a bike that doesn’t fit you perfectly and that allows you to achieve ideal position on the bike. If don’t yet know what your ideal position is on the bike you will want to spend the time it takes to figure it out. As once you have these data points it will make it much more likely that the next frame set you buy will be the optimal size/geometry for you.
Finding your 4 fit parameters
Saddle fore/aft and saddle height: You will need to identify these 2 fit parameters at the same time, as moving the saddle horizontally on the rails changes the effective saddle height. I normally measure saddle height from the center of the bottom bracket to the top of the saddle at a point directly over the center of the seat tube if it were to penetrate the seat.
As far as saddle height I think the Lemond method is a good place to start from. The Lemond method simply has you multiplying your inseam by .883 and setting your saddle height to the result (google how to measure your inseam for cycling. Taking multiple measurements is advised). Again this is just a starting point. You will want to experiment to find your ideal saddle height. Of course things start get a little gray when you start moving your saddle forwards or backwards and you will need to lower your saddle as you move your saddle rearward. As with your other changes you want to keep a log of the changes your have made.
Once you have ballparked the saddle height you need remember to remember to lower your saddle if you move the saddle rearward in the rails as you work on finding the ideal fore/aft position. As far as fore/aft I usually recommend starting with KOPS (google KOPS) and then experimenting with saddle height and saddle fore/aft until you find a position where you are maximally efficient pedaling and perfectly balanced on the bike (front to rear). This alone will take time as you will notice changes of as little as 2 to 3 millimeters in saddle height and to a lesser extent saddle fore/aft. You really need to take your time here finding your ideal saddle position. I would bring pair of allen tools on your rides and experiment with your saddle position.
Lastly you will want to be cognizant of saddle tilt. My recommendation is to go with a level saddle. Lastly, any changes to saddle height and fore/aft position will impact reach and saddle to bar drop. For now try to focus on your saddle position only and if possible ignore your reach.
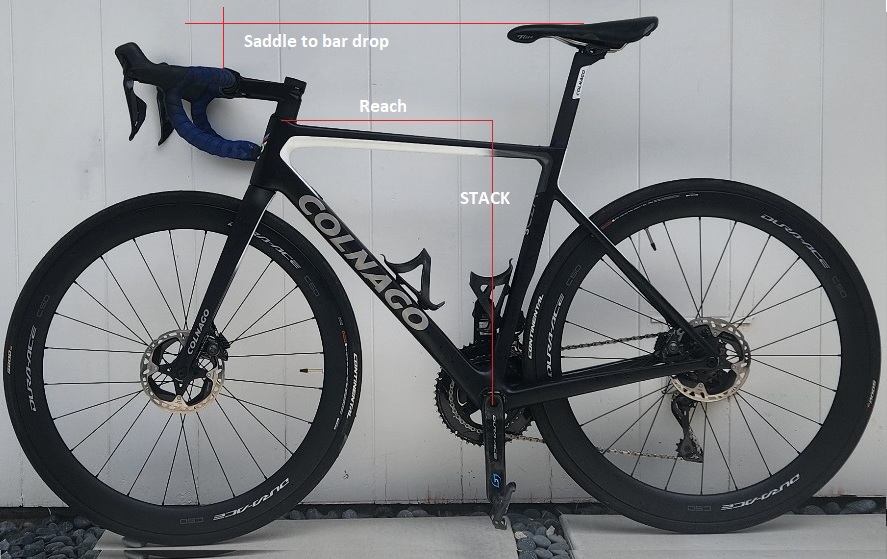
Reach and saddle to bar drop: After you have your saddle position dialed in you can now determine your ideal reach and saddle to bar drop. Here again, changes in one parameter will impact the other. Adding or removing stem spacers will of course change your saddle to bar drop but so will changing your stem length (assuming you are running with a standard rise stem – 6 to -12 degree). If you put on a longer stem to increase your reach you will be effectively reducing your saddle to bar drop.
Ideal saddle to bar drop and reach are really a function of your experience, fitness, flexibility, body dimensions and personal preferences. This is way more an art than a science. In order to determine your ideal reach and saddle to bar drop you really need to listen to your body when you go on test rides after making your latest change. You will want to record your changes and make note of how they the felt. Excessive pressure on your hands? Sliding forward on your saddle? Neck pain, back pain? Keep track the results of your changes.
If you want to be able to comfortably ride in the drops then you will need make sure your fit can accommodate this. If you don’t feel the need to ever be in the drops then that may drive your fit in another direction. Me, I’m rarely in the drops. I’m probably 70% at the hoods and 30% on the bar tops. Speaking of hoods, make sure they are positioned properly on your bars. The current approach to mount them at same height as the bar tops. You also have the option of deep verses shallow reach bars to fine tune your position. Of course the reach to the bar tops will not change when going from shallow to deep reach bars.
At the end of all this experimentation, adding and removing spacers, swapping out stems and dialing in your saddle position you should have a setup that puts you in something close to ideal body position on the bike. At this point you need to make note of any sub optimal things you had to do in order to achieve ideal positioning. If you didn’t have to resort to any of items 1 -3 (listed above) then picking your next frameset will be relatively simple. The two key parameters you need from your existing frameset are Stack and Reach. You will want to be cognizant of seat tube angle as well as you don’t want to have to shove your saddle all the way forward on your new bike in order to get it the proper distance back from your bottom bracket.
See image for how stack and reach is measured. The reach part is measured not from your seat post but instead from a vertical line from the bottom bracket. This is useful as by definition whatever your dialed in saddle position is it will be the same relative to the bottom bracket on any other frameset regardless of seat tube angle. Seat tube angle only impacts where on the rails your seat will be mounted.
As an example, if your dialed in saddle position puts your saddle in the middle of the rails on a 74 degree seat tube then another frame with a 73 degree seat post will put your saddle in the forward position on the rails. As far as reach you should have a little wiggle room as you can go with a shallower or perhaps deeper reach bars to fine tune your reach but as was mentioned, deep verses shallow reach bars don’t alter the reach to the bar tops.
The stack number is what will allow you to confirm whether or not you can set your saddle to bar drop without needing to add a bunch of spacers. If your new bike has a stack number that is close to your existing bike then assuming same head tube angle, stem rise/length then you should be able to get the same saddle to bar drop as your existing bike.
If you want to calculate with precision how much saddle to bar drop any frameset will present you with for a given stem and specific amount of stem spacers try this exercise:
Known values for my Colnago
Saddle heigh above ground: 98cm
Center of bottom bracket about ground: 27.5cm
Vertical height of saddle above bottom bracket: 70.5cm
Stack: 537mm
head tube angle: 71.6 degree
top cap: 5mm
Stem spacers: 20mm
Stem Stack:40mm
Stem rise: 6 degrees
Stem length: 12cm
Ok so how far above the bottom bracket will my bars be with these numbers?
We know the stack is 537mm above bottom bracket, we need to figure out where the bars will be. First we need to calculate how much vertical height the top cap, 20mm of spacers and half of the stem stack will be (We are measuring to the middle of the stem stack). So we have 5mm + 20mm + 20mm which comes to 45mm. 45mm at an angle of 71.6 = 42.7mm of vertical height.
Ok so now we know that the center of the stem is 579.7mm above the bottom bracket. How do we calculate the rest of the vertical rise?
The head tube is 71.6 degrees. So if the stem was a zero rise stem then the angle of the stem off the horizontal would be 90 -71.6 = 18.4 degrees. But in our case the stem is a negative 6 degree stem so 18.4 – 6 = 12.4 degrees. Now we can calculate how much vertical rise we will get since we know the angle (12.4 degrees) and we know the length (12cm). With those two values we get 26.4mm of vertical rise
https://www.blocklayer.com/riserun
so 579.7mm + 26.4mm = 606.1. That puts us to the middle of the stem bar clamp. The stem bar clamp is 31.7 mm diameter so we need to add half of this to our height calculation. 15.85mm + 606.1 = 621.95.
ok so what is our saddle to bar drop going to be here?
70.5 (saddle above the bottom bracket) – 621.95 = 8.3cm.
What if you had to implement any of items 1-3 in order to achieve good body positioning?
- Use of short stems.
- Excessive stem spacers.
- Zero setback seat posts and or saddle in an excessively forward position on the rails.
- Let’s say you prefer the handling you get with a 12cm stem and you needed to put a 9cm stem on your existing bike to achieve ideal reach? In this case you would need to get a frame set whose reach is 3 cm shorter than your existing bike. Don’t forget this will put your bars lower which will add to your saddle to bar height differential.
- Let’s say you needed include 4 cm of stem spacers to get your saddle to bar drop set right? If your goal is no more than 2cm of spacers on our new bike then you need to get a frameset whose stack is 2cm higher than your existing bike.
- Let’s say you had to shove your saddle all the way forward in the rails in order to get your saddle fore/aft set right? In this instance will want to pick a frameset with a steeper seat tube angle.
Conclusion
If you are serious about your road cycling then you will want to fine tune your fit on your bike.
The difference in ride feel between a perfectly sized and setup road bike verse one that’s not is very noticeable. In my opinion it’s well worth the effort ensure you are on the perfect size/geometry road bike that allows you to achieve ideal position without having to make any compromises. Working with a skilled bike fitter is a great idea but don’t stop there. A bike fitter is just another source of information. It’s up to you to put it all together.
It’s not really that complicated, in most cases it just comes down to simple math and an understanding of how various fit parameters will feel and how they will either make you more or less efficient on the bike. At the end of the day if you ride with fast riders being as efficient and powerful as possible will often make the difference between finishing your group ride with the leaders or getting dropped at the halfway point.
Looking at the Trek Madone SL 6 https://www.trekbikes.com/us/en_US/bikes/road-bikes/performance-road-bikes/madone/madone-sl/madone-sl-6-di2/p/36959/?colorCode=black
My LBS wants to sell me a 56. I’m 5’10”. I have never spent this much money for a bike before. Not sure about sizing. Based on your sizing guide the 56 will be too big for me. He says if the reach is too long that he will swap out the stem for no charge. Thoughts?
According to the geometry chart the size 56 has a stack of 563mm and reach of 391mm.
The questions you should be asking yourself include: Is the stack height ideal for the amount of saddle to bar drop I like? And is the reach correct for the length stem you want to run with?
I’m 5’ 10” also with an inseam of 84cm. Using my Colnago as a point of comparison. My bike has a 537mm stack height and a head tube angle of 71.6 Given my preferred seat height and 20mm of spacers that puts my saddle to bar height at around 8.4cm.
The Trek in a size 56 has stack height of 563 and head tube angle of 73.5 (much steeper than my Volnago). With the steeper head tube angle you are going to get less bar rise than I am getting with a 71.6 degree head tube angle. If you know the length and rise of the stock stem you should be able to calculate how high the bars will end up.
In the absence of you doing those calculations I will ballpark it for you. The stack on the Trek is 26mm higher than my Colnago. Assuming your are going to run with the similar saddle height as me and similar saddle to bar drop then as far as saddle to drop is concerned you could probably go with the 54.
Now lets look at reach. My Colnago’s reach is 382mm and I run with a 12cm stem. The Trek 56 has reach of 391. The 54’s reach is 386. So as far as reach the 54 sounds like the better choice.
Of course this is assuming you are good with 8 + CM of saddle to bar drop. Assuming you have a bike now. How is it setup? Do the math I outlined in the fit guide.